Image Upscaler
Upscale your images while preserving clarity and detail. Enhance resolution with AI-powered algorithms. Free, secure, no signup required.
Free
no account needed
Frankfurt
stored in the EU
2 hours
then files are deleted
Your files
Add them here, we do the rest
Drag and drop your files here, or import from:
Upload files up to 100 MB in image formats
- JPG
- JPEG
- PNG
- WEBP
- TIF
- TIFF
- BMP
See what upscaling does to a real photo
Three small pictures, each upscaled 4× from 240 × 180 to 960 × 720. Pick one, then drag the handle across it to compare the original with the result.
 BeforeAfterDrag to compare the original with the upscaled result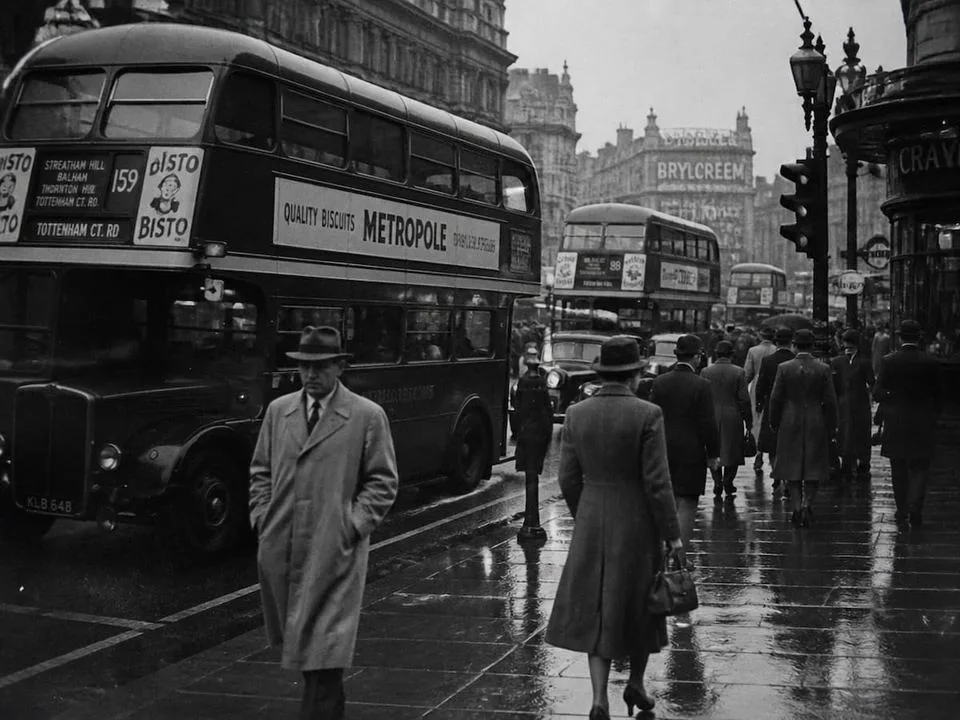

Designers, artists and bloggers use it the same way: one upscaled image can serve a screen, a print and a social post without being made three times.
How to upscale an image
Three steps, no account, nothing to install.
Add your image
Drop a JPG, PNG, WebP, TIFF or BMP file up to 100 MB, or import it from Google Drive, Dropbox, OneDrive or a URL.
Pick the settings
Pick the scale, the mode and the face switch. The next section says what each one does, and works the scale out from your own numbers.
Download the result
Save the upscaled file, copy a link or send it to Google Drive or Dropbox. It is deleted from our servers after 2 hours.
Choosing your settings
Three switches. Mode and faces follow from what is in the picture. The scale follows from where the picture is going, so the checker works it out from your size.
Scale
2×4×2× doubles the width and the height. 4× gives sixteen times the pixels, for prints, posters and very small originals.
Mode
PhotoAI artPhoto for anything taken with a camera. AI art for drawings, anime, logos and generated images, which have flat colors and hard lines.
Enhance faces
OffOnOn when there are people in the picture. Off, the default, for everything else: it can smooth a landscape or a product too far.
2× or 4×: which one do you need?
Pick what the image is for and enter its size. We will tell you which scale to choose.
Don't know the size? Check it with Image Info
How to get the sharpest result
Before you upload
Start from your biggest original
A file that has been compressed hard leaves the model less to work with. Upload the largest, least-saved copy you have, not a screenshot of it.
Blurry rather than small? Enhance it first
Upscaling adds pixels; it does not fix focus or grain. Clean the photo up with the Image Enhancer first, then upscale the result.
After you download
Check it at 100% zoom
Look at faces and any text first. If 4× looks too smooth or plastic, run the same file again at 2×.
A JPG comes back as a JPG, the rest as PNG
PNG, WebP, TIFF and BMP files come back as PNG, so nothing is lost to compression on the way. Need a smaller file? Convert it from PNG to JPG afterwards.
Why AI upscaling beats stretching
Stretching an image only spreads the pixels it already has, which is why an enlarged photo goes soft. AI upscaling invents the missing pixels from what it recognizes in the picture, so the bigger version stays sharp.


It reads the picture first
The model finds the textures, edges and shapes, so it knows what it is looking at before it makes anything bigger.
It draws the missing pixels
Where a stretch would repeat a pixel, the model paints in detail that fits what the picture already contains.
It keeps edges hard
Lettering, brickwork and hair stay crisp instead of blurring, because the model has seen millions of examples of each.
Related image tools
Blur Face
Detect and blur every face in a photo, in your browser.Thumbnail Generator
Create a PNG thumbnail from a PDF page, a video frame or an image.Image Enhancer
Sharpen and clean up photos for a crisper, richer picture.Image Enlarger
Enlarge small or low-resolution images.Crop Image
Cut unwanted parts out of any image.Passport Photo Maker
Make a compliant passport, visa or ID photo for 70+ documents.Remove Metadata
Strip EXIF, GPS and other hidden metadata from photos.- New
Remove C2PA Metadata
Strip C2PA Content Credentials and keep everything else, in your browser. Image Resizer
Resize images to specific dimensions for web, apps, or print.Remove Background
Remove backgrounds from images instantly.Colorize Photo
Bring black and white photos to life with realistic AI colour.Image Info
Check an image's dimensions, size, format and print size.AI Watermark Remover
Erase logos, stamps, date burn-ins and tiled text from photos with AI.AI Photo Editor
Edit photos by describing the change in plain words.URL to JPG
Capture any public web page as a JPG image.URL to PNG
Capture any public web page as a crisp PNG image.
Questions about upscaling images
Still have questions? Contact support.
What does an image upscaler do?
It increases the pixel dimensions of an image, here by 2× or 4×. Instead of stretching the existing pixels, AI predicts the missing detail, so the bigger image stays sharp.
How do I upscale an image to 4K?
4K is 3,840 × 2,160 pixels. A 1,920 × 1,080 image reaches 4K at 2×. A 960 × 540 image needs 4×. Use the 2× or 4× checker above to test your own size.
Should I pick 2× or 4×?
Pick 2× for web pages, slides and social posts. Pick 4× for prints, posters or when the source is very small.
What is the difference between Photo and AI art mode?
Photo mode is for camera shots. AI art mode is for illustrations, anime, logos and AI-generated images with flat colors and clean lines.
Which file formats can I upscale?
JPG, JPEG, PNG, WebP, TIFF and BMP, up to 100 MB. A JPG comes back as a JPG; every other format comes back as a PNG.
Is the image upscaler free?
Yes. It is free and works without an account.
What happens to my images?
They travel over HTTPS and are deleted from our servers after 2 hours.
Can upscaling fix a blurry photo?
Upscaling adds pixels and some detail, but it is not a blur or noise fix. For that, use the Image Enhancer first, then upscale the result.
Got a small image? Make it 4× bigger.
Free, no account, deleted after 2 hours.